Tour of MS Teams
This page provides an overview of MS Teams most used functionalities, including collaborative tools, real-time communication features, and navigation tips. Learn how to effectively use MS Teams for video meetings, file sharing, and instant messaging to support your educational activities.
The table below describes a few examples of ways you can work together in MS Teams.
| Scenario | Possibilities |
| Interactive classroom experiences | Organise classroom discussions before, during and after meetings and collaborate with students on documents. |
| Group work and projects | Make group channels in teams where groups of students can chat, collaborate real-time in documents, and have online group meetings. |
| Lesson planning with fellow lecturers | Develop lesson plans in collaboration with lecturers in or outside the TU Delft. |
| Professional learning communities with colleagues | Collaborate within a professional learning community, such as an academic department or group working on a shared goal. |
-
MS Teams has many different functionalities which can be used in an educational setting. This table provides an overview of the most important functions.
Functionality Possibilities Online meetings Create online meetings for up to three hundred participants (a thousand participants with the Advanced Communications License (ACL)). It’s possible to share the screen, use the chat and create breakout rooms. Webinars For structured presentations and guest lectures, featuring Q&As, and polls with up to a thousand participants. Live Events Broadcast video, audio and other content. Up to ten thousand attendees can join the event, but they can only participate via a Q&A chat. Chats and Tabs Chat, reply, share documents and images with students and colleagues. It is also possible to create and use multiple channels for different purposes. Collaboration in documents Real-time collaboration in Word documents, PowerPoint presentations or Excel sheets. Polls Create engaging polls or surveys. Planner Organise tasks by adding one or more Planner tabs to a team channel. Create a plan, add and assign tasks to team members. OneNote Share notes in real time before, during and after a MS Teams meeting. Calendar The calendar imports your meeting information from your Outlook Exchange calendar. Personal settings Access personal settings by clicking on your name and selecting settings. There are settings for themes, layout, privacy, what notifications you receive and many more.
-
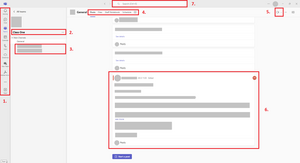
Below is a screenshot of what MS Teams looks like:
In the Navigation bar (1) you can navigate to the different screens of MS Teams:
- In the Activity menu, you will get all your notifications of everything that happens in MS Teams.
- In the Chat menu, you can see all one-on-one chats as well as group conversations with multiple people.
- In the Teams menu, you can find the Teams (2) that you are part of.
- Within Teams, you can make Channels (3) for specific topics or projects. You could for example make a channel for every week or lecture of your course.
- Each channel has Tabs (4). By default, the Post, File and Notes tabs are present. In the Posts tab, Everyone within the channel can start conversations (6) and reply to them. In the Files tab, you can store files that are related to the channel. Every channel has its own file repository. The Notes tab is linked to a notebook in Microsoft OneNote and gives the possibility to make collaborative notes. You can add tabs to quickly navigate to apps, or files if you wish.
- Within a channel, you can also start an online (video) meeting (5).
- You will find that the Calendar menu is synced with your Outlook Exchange calendar. Here you can schedule meetings.
At the top of the page, you can find the Search bar (7). You can search for anything or anyone in MS Teams.
More information about creating a new team in MS Teams can be found on this page. -
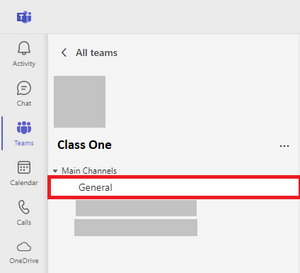
Every Team has its own General channel.
The General channel and the notifications within cannot be deleted. To test functionalities in MS Teams it is advised to add a test-channel so that you can delete it later on.
Channels organise all the files, conversations, and apps for a topic in one place. They can be created for group work, topics, weeks, units, and more.
To learn more about how to add a channel to a team, go to this page.
-
Channels have Tabs that allow you to integrate tools and pages into your or channel. Tabs are always visible at the top of the channel.
By default, every Channel has the following Tabs:
- Posts: For post messages within the channel.
- Files: To store and collaborate on files shared in the channel.
- Notes: To make and share notes within the channel.
Grading and Assignment features are turned off in MS Teams at TU Delft, these tabs are not available in your class environment. The TU Delft offers more mature solutions.
Add Tab to channel
- Select the plus-icon (+) on the Tab bar.
- Select the App that you want to add.
- Fill in the Tab name and choose the Content that you want the Tab to point to.
- Select Save.
-
To communicate within MS Teams, you can use both posts and the chat function.
Posts in MS Teams
- To create a message for your whole team, click Teams
 , then pick a Team and a Channel.
 - Select the Posts tab.
- Click the Start a post
 button on the bottom, type your message and click Post
  .
. - Use @ and the name of your Team or Channel to notify everyone of your post.
Example: @teamname - Use the Reply option when you want to reply instead of starting a new post.
Conversation in a Chat
Chats can be with one student/colleague or a group of students and/or colleagues. To start a new chat:
- Click New chat
 under the Chat tab.
 - In the To-field, type the name(s) of the people you would like to chat with.
- Optionally, give the chat a Group name by selecting the downwards arrow to the far right of the To-field.
- Type your message in the compose box and click Send
 .
. - Optionally, you can schedule your message by right-clicking the Send
 and setting the date and time.
In a chat, you are able to send messages but can also include files, links, emojis, stickers, and GIFs.
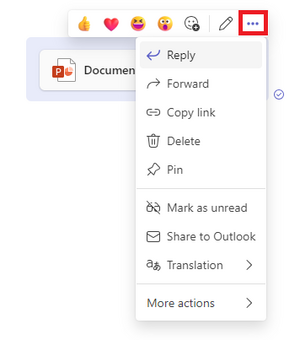
While hovering over your sent message with your mouse, you can click the three dots. This opens a drop-down menu:
- By clicking Reply, you can reply to your own message, by including the message at the top of your reply. If you would like to reply to the message of someone else you can find the reply symbol next to the three dots.
- By clicking Delete, you can delete your message for everyone.
- By clicking Pin, you can pin your message to the top of the chat, making it easily accessible by clicking the Thumbtack symbol in the top left of your chat screen.
- By clicking Mark as unread, you can make it so that people you are chatting with, cannot see that you have read the message.
- By clicking Translation followed by clicking Translate, you can translate the message to your desired language.
- By clicking More actions followed by clicking Immersive Reader, the message will read out loud.
By clicking the edit symbol next to the three dots, you can edit your sent message.
- To create a message for your whole team, click Teams
-
Each Channel has its own Files folder where files can be shared. To access that folder: go to the Channel and select the Files tab above the conversation window.
There, you can create New files and folders (1) or Upload existing files and folders (2) for members to work on simultaneously in the Channel. In the background, all files are saved in SharePoint.
Organise your files in Folders. Pin the most used files to the top of your list for easy access. Right-click on the file and select Pin to top.
Share a file in a conversation
You can also share files in the Posts tab or a Chat. Any file you share here can be opened by all the members in that Channel or Chat.
- In the Posts tab or the Chat, click the Attach-icon
 under the box where you type your message.
 - Select one of the options.
- Select a file and add it to the post.
- Click Send
 .
.
The file you shared can be found in the Files tab of the Channel or Chat.
If you share a file in an MS Teams chat, and later share a different file with the same file name in another chat, a confirmation box will pop up asking if you want to Reshare the old file (see image below). If you ignore the message the new file will be sent to the recipient.
Collaborate on files
In MS Teams you can work on files together at the same time. When you post a file in the Posts tab, you can start a conversation about a file to which everyone in the Channel can respond.
- Go to your Team and Channel in MS Teams.
- In a Posts tab or the Files tab, select More options
 next to the file.
 - Choose if you want to Edit in Teams, Open in Browser or Open in Desktop App.
- Edit the file. Coloured flags show who else is working on it with you.
Add read-only Class Materials
Do you have important files you do not want students to edit? Use the Class Materials folder in the General channel.
- Navigate to the General channel in your Class Team.
- Select the Files tab and go to Class Materials (Lesmateriaal) folder.
- Select Upload to add files.
- In the Posts tab or the Chat, click the Attach-icon
Need support?
Get in touch with us! We are happy to help.


