Using Rubrics
Rubrics are a way to use standardized grading methods to evaluate your students. They are a great way to evaluate students when you are not using objective test items to test your students’ progress.
Objective testing is a form of assessment where there are definitive right and wrong answers. These can be graded automatically using multiple choice questions, true/false etc.
Using Rubrics standardizes grading, making results more fair and reliable. Although it does take some time to set up Rubrics for your course, you will save a lot of time in the long-run on grading and providing feedback on student performance, and you can re-use your rubrics for as long as they are relevant to your assessments. For more information on designing Rubrics see this page.
In order to use Rubrics, they will need to be linked to an activity such as an Assignment, Discussion board, etc.
When your content has been copied from a previous year, you will have to re-enable both the Competencies and Rubrics tools in the Tool menu to be able to use Rubrics in your new course.
Rubrics grading experience is also available for group assignments and discussions. Also, rubric scores will be transferred to grade items automatically.
-
Rubrics and Competencies work together in Brightspace and both must be enabled for you to use the Rubrics. To enable both tools go to Course Admin and select Tools. You will only have to follow these steps once for each course.
Scroll down to Competencies and click the slider box to enable the tool. A checkmark instead of a cross (x) should display.
Scroll down further on the same page and enable Rubrics.
-
There are two types of rubrics you can choose from in Brightspace:
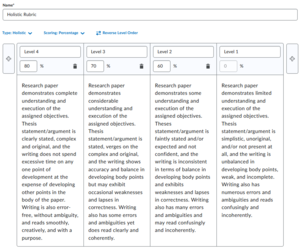
- Holistic. Holistic rubrics consist of single criteria rubrics (one-dimensional) used to assess students’ overall achievement on an activity or item based on predefined achievement levels. The performance descriptions are usually written in paragraphs and usually in full sentences. Holistic rubrics may use a percentage or text only scoring method. Example of a holistic rubric for a Research Paper:
Figure: Example of Holystic Rubric, adapted from John Bean, Engaging Ideas, Exhibit 15.4: Holistic Scale for Grading Article Summaries (262
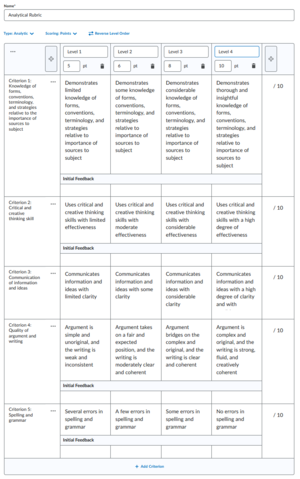
- Analytical. Analytical rubrics are two-dimensional rubrics with multiple levels of achievement as columns and assessment criteria as rows. Analytical rubrics allow assessing a students’ achievements based on multiple criteria using a single rubric. Different weights (value) can be assigned to different criteria and include an overall achievement by totalling the criteria. Using points and custom points for analytic rubrics may use both text and points to assess performance. With custom points, each criterion may be worth a different number of points. For both points and custom points, an Overall Score is provided based on the total number of points achieved. The Overall Score determines if students meet the criteria determined by instructors. The Total and the Overall Score of the rubric can manually be overridden. Analytical rubrics are usually written in a table form.Example of an analytical rubric for a Research Paper:
Figure: Example of an Analytical Rubric, adapted from Centre for Teaching Excellence, Appendix B: Sample Analytic Rubric (“Rubrics: Useful Assessment Tools).
-
When making changes to an existing Rubric, be aware that all changes are saved automatically.
Rubrics and Competencies work together in Brightspace and both must be enabled for you to use the Rubrics.
There are two ways to create a rubric:
- From the Rubrics tool in the Course Admin page
- From the Assignments tool, while setting up an assignment
To set up a Rubric, do the following:
- Create a new Rubric
- From the Rubrics tools:
- Open Course Admin in a course and select Rubrics.
- Click on New Rubrics.
- From an existing Assignment:
- Click on the Assignment you want to add a Rubric to, and click Edit Assignment
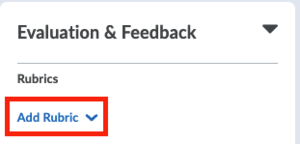
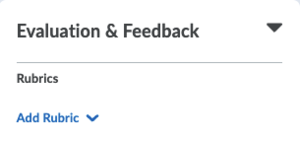
- In the Evaluation & Feedback menu, select Add Rubric and click Create New
- From the Rubrics tools:
- Setting up a Rubric
- Choose a Name for the Rubric
- Set the “Status” to “Published“ if students are allowed to view the Rubric (Rubrics set to “Draft” or “Archived” will not be able to be linked to an assignment).
- Select Type (see ‘Types of Rubrics’)
- Select the manner of Scoring
- Set the number of Levels and assign a score (if used) to each level
- Select the number of Criteria. Additional criteria can be added by selecting the ‘+ Add Criterion’ button
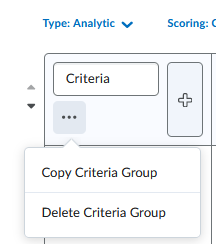
- Add additional Critera Groups by clicking on Add Criteria Group below the table or click on the three dots in the top left corner of the rubric table to Copy- or Delete Criteria Groups
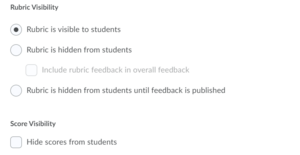
- Under Options you can set the Rubric Visibility to show or hide scores in the student view (see ' Rubric Visibility settings' for more information)
- Add a description for the Rubric if required. These notes will not be visible to students.
- Choose whether the Rubric should be associated with a Competency and/or ePortfolio in Brightspace to aid in assessing competencies.
- You can now start adding content to the Rubric in the single-page workflow document. You can also delete criteria and levels and reorder them. See 'Levels and Criteria' for more information.
- Click Close when the Rubric is finalized.
Rubrics in draft state are not visible to students until you select Save and Publish, at which time students can immediately view their feedback from Assignments, Content, Discussions, Grades and User Progress.
To preview the created Rubric, you can go to Preview in the drop-down menu next to the rubric you would like to preview. Here, you will be able to see the Rubric, and also download or print it. This can be done by clicking on the Print button.
-
Criteria: Which deliverables, behaviours or applications of knowledge or skill will be looked for when assessing the activity? What needs to included and what should be said? What are the outcomes of the assessment? What should the student know or be able to do at this stage? Use the answers to the questions above to define the criteria for the rubric.
Levels: The levels of a rubric can be compared with a Likert scale. Use levels to determine to which extent the student has met the criteria. Many levels can be added to a rubric but the simpler the rubric, the easier it will be to use it. The student may earn marks for their level of achievement.
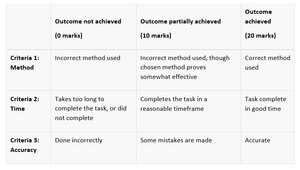
Below, a generic example of a rubric for a practical assignment:
As you can see, Rubrics state clearly what you want your students to achieve. It also helps clarify if you are assessing the right outcomes. It is recommended that you make the Rubric available to students so that they know exactly what is expected of them. If you don't wish to make the entire rubric avaiable, at least the criteria according to which they will be assessed should be available to the students. Instructors can enter a score for a criterion on a points-based rubric before clicking on a level within the Rubric.
-
Rubrics can be associated with activities such as Assignments, Discussions or to a Grade Item.
Rubrics should only be associated with the activity (not the grade) and assessed in the activity (Discussion, Assignment). The Rubric will then automatically display in the Gradebook. The only exception is with observational activities or when intended to grade offline activities.
It is possible to edit the Rubric after the associated rubric was already used to grade students. It is not possible to make sweeping changes and is meant for minor changes to adjust spelling, grammar, and/or to improve clarity.
You can edit these locked assessment Rubrics by navigating to Course Admin and then clicking on Rubrics. Click on the dropdown menu after the name of the Rubric and then on Edit Options. In the page that opens a warning will be shown about the Rubric being locked. You can still edit the Rubric by clicking on Edit Text in the warning.To associate a Rubric with an activity, do the following steps:
For Assignments:
- Go to Assignments.
- Click the drop-down arrow next to the ASsignment you want to add the Rubric to and select Edit Assignment.
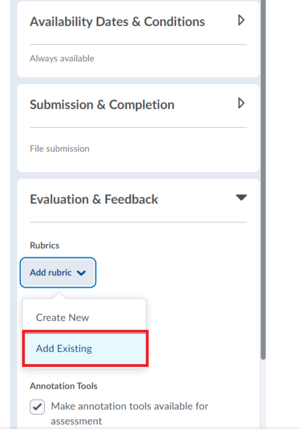
- Click Add Rubric > Add Existing in the Evaluation & Feedback tab.
- Select the Rubric you want to use, then click Add Selected.
- Click Save when you are done.
For Discussions:
- Go to Discussions.
- Click the drop-down arrow of the Topic you want to add the Rubric to and select Edit topic.
- Select the Evaluation & Feedback tab.
- Click Add Rubric > Add Existing
- Select the Rubric you want to add, and click Add Selected.
- Click Save when you are done.
In the exception of grading offline or observational activities, it is possible to associate a Rubric to a Grade Item. To do so:
- Go to Grades and select Enter grades.
- Edit a Grade Item or create a new one.
- In the Properties tab, click Add Rubric
- Select the Rubric you want to add, and click Add Selected
- Save and Close.
-
Once the Rubric has been created and is linked to an Assignment, you can then grade the students based on the Rubric.
- Click on Assignments and select View Submissions.
- Select the student whose submission you would like to grade.
- After opening the submission, you can see that your rubric is attached and at the moment doesn’t have a checkmark
 next to it, like this one has:
  . The checked rubric icon displays only when a Rubric has been fully scored by the instructor. The unchecked Rubric icon displays when a Rubric is unscored, or is partially scored, to provide instructors and learners with more visual information about the status of the Rubric.
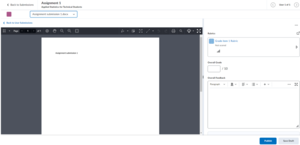
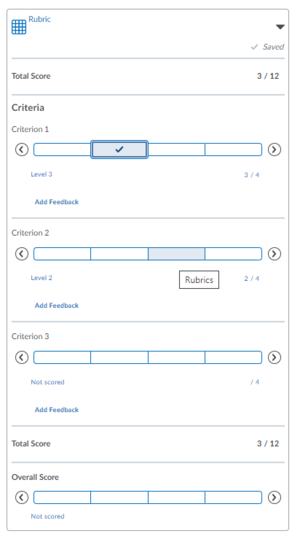
- Click on the Rubric to start grading the Assignment using the rubric. This will opens an inline assessment on the right of the screen. You can easily grade by hovering over the criteria and selecting the right box. When you have assessed the student click Publish. If you want to finish your assessment later, you can Save Draft.
- You can also open the Rubric in a new window by clicking on the icon in the top right corner.
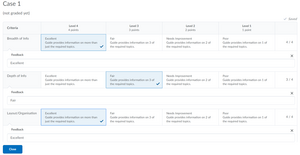
- According to your Rubric criteria, you can assess the student submission.
- Once you have given your feedback, click Close. If you have not filled in all criteria, you can always reopen the Rubric.
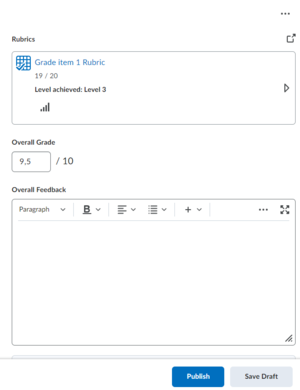
- You will then see there is a checked mark next to your rubric indicating that it has been successfully filled along with the level achieved and points obtained. Also, the grade will be automatically entered in the Overall Grade field.
- The Retract Feedback option enables you to remove published feedback from the students’ view for changes to the Total Score. The Overall Score and Overall Feedback portions of the Rubric can be edited without retraction.
-
As explained earlier, you can choose whether or not you want Rubric content to be visible for your students, with some additional settings:
- If you selected the Rubric to be hidden for students, they will not be able to see the Rubric anywhere.
- If you selected the Rubric to be hidden for students and selected the option ‘include Rubric feedback in overall feedback’, the feedback provided on hidden Rubrics will be transferred back to general feedback. The feedback from a Rubric with this option enabled will appear to the student as part of the general feedback on the activity.
- If you allow students to see the Rubric, students can see their full completed Rubric (including the selected levels and instructor feedback) in the following places:
- Gradebook
- Discussions and Assignment
- User Progress, including Grades tab
- Content tool where activity is included (Assessment section)
FAQs
-
If you already created a Rubric and cannot click the link to attach your pre-existing rubric to your course, then it’s because the “Competencies” tool is inactive. Follow the steps below to enable it:
- Go to the Course Admin and then Tools and activate the Competencies tool.
- Within the properties of your Rubric make sure the option “Allow new associations in” is checked for Competencies. This option can be found in the Rubric Edit Properties menu under “Advanced Availability”, at the bottom of the page.
Please notice that grade items that are directly associated with a Rubric will no longer be able to be linked to activities.
Once you have selected the Competencies, you’ll be able to click Add rubric in the assignment settings via Edit Assignment.
- Click Add Rubric and select which Rubric you would like to add to the assignment.
- Click Save when you are done.


