Ans print & scan
Ans print & scan allows you to create your exam digitally in Ans, have it printed and scanned, review the exam online with your teaching team, and have students review their graded work online.
Why choose print & scan?
- Students can write & draw sketches, graphs, and calculations on paper.
- You can grade paper exams online with multiple assessors in parallel, using shortcut keys.
- You can give students online access to review their graded exams.
- You do not need to scan the exams and troubleshoot scanning issues yourself.
- The exams are safely transported and distributed in sealed boxes.
- Your exams are archived for you.
- You can adjust the score for certain correct steps or errors during and/or after grading. You can use test result analysis to adjust grading.
Timeline / deadline for printing
The standard deadline for printing your exam is at the latest 3 working days before the exam day. We suggest meeting this deadline to be able to check your printed exam.
| Deadline (day) | Deadline (time) | |
| Standard | At the latest 3 working days before exam day | Before 12:00 |
| Quick | At the latest 2 working days before exam day | Before 12:00 |
| Urgent | Mail to examsupport@tudelft.nl | |
For urgent printing orders additional costs (express rate) are applicable.
Step 1
-
If your exam course in Ans has not been created yet, email ExamSupport@tudelft.nl to request an Ans EXAM course.
- Click here for information on how to log into Ans.
- Once you have access to Ans, please select your Ans Exam course or use the search bar to find it.
The assignment needs to be created in the Exam course and not the Brightspace course.
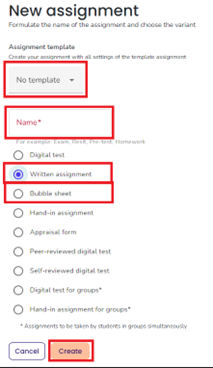
- Click on the New assignment button in the top-right of your screen.
- When choosing the assignment format, select the following settings:
- Template: Leave it blank (No template).
- Name: Enter the course code of your exam together with the exam day (e.g. COURCECODE EXAM/RESIT 25-03-202).
- Assignment: select Written assignment or Bubble sheet.
Bubble sheets can only handle mc-questions with a single answer.
- Add questions to the assignment (click here for information about the question types)
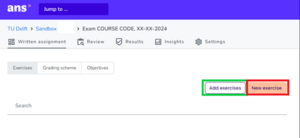
You have two options:- Create a new exercise (question) directly in your exam. Select the orange button New exercise to do so.
- Import existing questions from your question bank. Select the green button to do so.
More information on Assignments in Ans can be found here.
Scrap paper won’t be scanned, please be generous with how much space you provide.
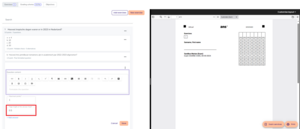
Ensure you provide enough writing space for each question. You can add more writing space by adjusting the answer field height. As an example: 0.5 is half a page, 0.3 is 30% of the page, etc..
Extra writing space can be created at the end of your assignment by adding a question without content or points. Instruct students to note down the page number of any extra added space(s) in use. Inform them that any information outside of answer boxes won’t be noticed unless its use is clearly stated and located within the exam.
Step 2
-
- Login to the Canon Exam Services portal with your TU Delft NetID (SSO). On the home page, select Technische Universiteit Delft as School and click the black button Technische Universiteit Delft that shows up below.
If you don’t have an account from the Exam Services yet, email Exam Support with your faculty information and request an account creation.
- Select the Create new Exam button.
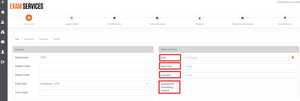
- Enter general exam information under the Info tab:
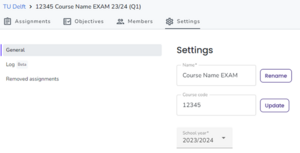
- Subject name: copy the same course name and course code as in your Ans Exam
- In Ans, go to the course (exit the assignment first) Click settings on the top right.
- Copy the course name and paste it in the Exam Service Portal.
- Exam type: There are 3 options to choose from.
- Print & Scan (most common) – Your exam will be printed and scanned for you through Exam Services. You will be able to review the results in Ans.
- Print Only – Your exam will be printed for you and you will grade this yourself. The results will not be scanned.
- Grade On Paper & Scan Later (least used) – Your exam will be printed for you and you will review the answers manually. Once the exam is graded, it will be scanned and you will have the results available in Ans. Please note that with this option:
- You need to add score boxes under each question in your exam in Ans. These score boxes will be scanned.
- Enter the day on which the reviewed exams must be picked up by the Canon scan service in Exam Services.
- Cost centre: Add the Baancode/Cost centre code that you have been given permission to use by your faculty.
It is not possible to add a Baancode/Cost Centre code to an exam afterwards.
- Enter the Exam date, Start time and End time. Your deadline for submitting your exam will be calculated and shown under Deadline for submitting content.
- Select the Distribution Point.
The distribution point is where you will collect the printed exams and hand in the completed exams (to be processed and scanned). - Select Add.
- Double click on your location of preference. Click here for more information on these distribution points (such as opening hours).
- Select Next.
Step 3
-
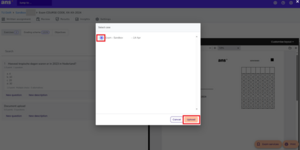
- Open your assignment in Ans. Click on the Exam services button to link your exam to the Canon Exam Services portal.
- Select the exam and click Upload.
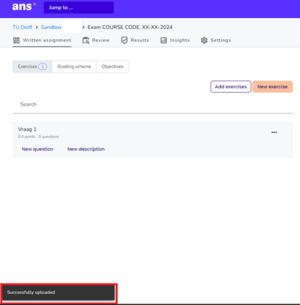
Once the upload is completed, you will see the message Successfully uploaded appear at the bottom left of your screen.
Step 4
-
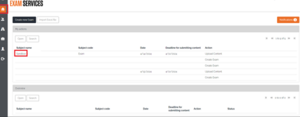
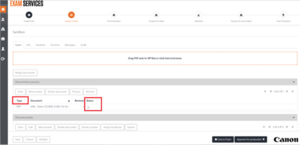
- Return to the Exam Services portal. Your exam will now appear on the home page.
- Double click on your exam to start defining your print order. In the screenshot, the ‘Sandbox’ is an exam example.
- (Optional) You can add other files (.pdf or .zip files) to be printed in addition to your exam. E.g., formula sheets. Upload these files by dragging them into the upload field. All files will then appear in one assignment.
- Open the exam by clicking on the magnifying glass under Status or double-click on the Ans pdf Name course.
The exam is initially added in a PDF format and will be converted into a ZIP file when the process is finished.
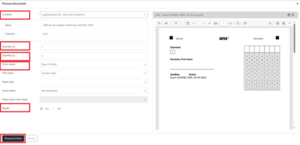
- Complete the following information for your print order (see screenshot below):
- Quantity A4 / A3: Indicate the number of exams you would like printed for each format (A4 / A3). The A3 format can be used for students who have been granted this provision by the Board of Examiners.
- Colour mode: Choose your desired colour mode. The default is black and white.
- Staples: Choose if the exam should be stapled. The default is Yes. Note that opting out of stapling can make troubleshooting for missing pages harder.
- Process & Done: Click the Process & Done button.
- On the Exam tab, you will see that the status of your exam has been approved.
- Double check that everything is entered correctly.
- You can opt to save your print order by selecting Save at the bottom in case you don’t want to send the order just yet.
- Once you are ready to send out the print order you can select Approve for production.
Beware that once you have clicked Approve for production it is no longer possible to change any details of a print order.
- You will receive a confirmation email of your print order.
- You can track the processing of your exam via the Audit button on the Exam Services portal.
Step 5
-
- You will receive an email when your exam is on the way to your selected Distribution Point as well as when it has been delivered and is ready to be picked up.
- The person who creates the print order in the Canon Exam Portal and the people listed in the study guide under the course code can pick up the exams.
- If you want to authorize someone else to pick up the exams, you can do so by emailing examsupport@tudelft.nl.
Warning: The employees at the Distribution Points are instructed to not hand exam boxes to people who are not associated with the course for safety reasons. Thus, make sure that Exam Support is informed if someone else will be picking up the exams.
- The person picking up the exams must have their campus card to identify themselves.
Warning: The employees at the Distribution Points are instructed to not hand you the exam box if you are unable to identify yourself with a campus card (or passport / ID).
- Once you have the exam box, check if it the correct one by reviewing the form that comes attached to the side of the box. The form can be found in the plastic sleeve attached to the box.
- Remove the form from the sleeve and check on the back of the form ifyour course code and exam day are listed to ensure that you have received the correct exam.
- Place the form back once you have confirmed that you have received the correct exam.
- When opening the box in your office, check whether the handwritten code on the inside of the box is the same as the code on the red seal outside the box. If not, contact Exam Support.
- Please place the scanning instructions that are in an envelope, inside the box.
- Leave the form inside de sleeve on the box because it is needed for the rest of the process.
Never scan the QR code on the box yourself (the QR code is for the couriers only)!
Step 6
-
- Bring the box with the printed exams, the participants list and the last-minute list if there are no invigilators at your exam.
Before the students enter the room, ask the invigilators to do the following:- To add the last-minute students to this last-minute list and to check the extra time box (column ET) if the last-minute brought proof of extra time (ET).
- To use the column ‘A’ (Student present) to register all students, while doing rounds and checking student ID.
- To mark the column ‘TI’ (exam submitted, see below) for all students who handed in their exam.
- During the exam double check whether this process is being carried out and help if necessary.
Click here for information why it is important to bring the participants list and last-minute list.
- Bring the box with the printed exams, the participants list and the last-minute list if there are no invigilators at your exam.
Step 7
-
If you have opted for the exams to be scanned through the Print & Scan process you will need to prepare the box that the exams came in and deliver it to the same distribution point to be picked up and for your exams to be scanned.
- Fill in the form Scanning instructions and indicate exactly how many exams will need to be scanned. Precision is important here so that Canon can reassure that all exams have been scanned.
- Place the following documents in the box:
- The completed exams (place these in the bottom of the box).
- The participant list.
- The last-minute list.
- The filled-in scanning instructions form.
Do NOT include scrap paper NOR empty exams in the box. Instead, dispose these in the securely sealed paper bins. Including these documents will lead to extra costs.
- Seal the box with the seals found in the box.
Additional seals are available at the Distribution Point. - Bring the sealed exam box to the same distribution point where you picked up your exams. Exam boxes brought to the ESA distribution point between 10:00 AM -11:00 AM on the day after the exam will be collected on the same day.
Warning: If you have opted for GradeOnPaper&ScanLater (manual review). Return your completed and reviewed exams to the Delivery Point on the day indicated on the Exam Services portal when you entered your print order.
- Seal the box with the seals found in the box.
Additional seals are available at the Distribution Point. - Bring the sealed exam box to the same distribution point where you picked up your exams. Exam boxes brought to the ESA distribution point between 10:00 AM -11:00 AM on the day after the exam will be collected on the same day.
- You will receive a confirmation email when the exam had been collected and when the exam has been uploaded in Ans.
- The scanned exam will be available in Ans 2 working days after the exam.
Once the results have been scanned and made available in Ans, you can begin Reviewing your Exam in Ans. After reviewing, there is the option to publish the results and share them with students. You can find more information about this here.
