Organise Ans Assignments on Brightspace
Below we will explain the steps to organise and schedule a digital Assignment in BRIGHTSPACE Courses. When organising a digital Assignment, you should consider three steps:
- Schedule the Assignment for the correct Learners and the correct (amount of) time.
- Check other Assignment Settings.
- Create a link to the Assignment in Brightspace.
Whenever an Assignment from a BRIGHTSPACE Course is linked to Brightspace, it automatically adds the Learners that click on that link to that Ans Course.
Schedule Assignments
When you have created a final version of a digital Assignment, including Exercises with Grading Schemes, it is ready to be scheduled. Learners are not automatically able to see any Assignment in an Ans Course. Scheduling makes an Assignment available for Learners. Four scheduling options are discussed below.
- You can create Groups, if you do not want all Learners in the Course to take the same Assignment (simultaneously).
- You need to set a Timeslot in which Learners can make the Assignment.
- And you can set a Time Limit; the maximum amount of time a Learner can spend on the Assignment within the Timeslot.
- You can also give certain Learners the right to Extra Time.
The Timeslot outweighs the Time Limit. If for example the Timeslot is 9:00-11:00 and the Time Limit 90 minutes and a Learner begins the test at 10:00, they will only be allowed to work on the Assignment till 11:00 even though their 90-minute Time Limit has not yet passed.
-
You need to have organised at least one individual Ans Assignment via Brightspace, before you can create Groups, because otherwise Learners are not automatically enrolled in your Course yet.
To create a Group:
- Go to your Course.
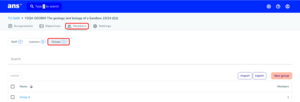
- Go to the Members tab. Then click Group.
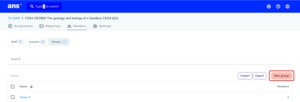
- Click the New Group button.
- Fill in the Group Name and click Save.
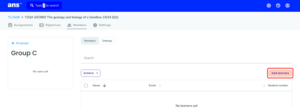
- Click Add Learners.
- Check the boxes for Learners you want to add and click Add.
If you want to create more Groups, follow the steps again.
-
With this method, you make certain Learners eligible for Extra Time for all Assignments in your Course. You set the amount of time, when setting the Timeslot.
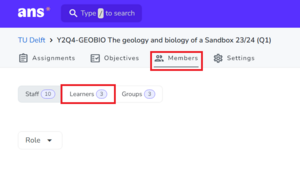
If the Learners in question are not enrolled in your Course yet (from a previous Ans Assignment via Brightspace), you need to add them with the Add Learners button on the Members > Learners tab of your Course first.
- Go to your Course.
- Go to the Members tab and click Learners.
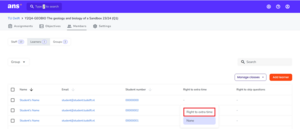
- Click on the dash (-) in the row for the Learner and the column for 'Right to extra time'. Then select Right to extra time.
-
Digital Assignments that are organised in secure locations on the TU Delft campus are scheduled by Exam Support. The steps below describe how to schedule a formative Assignment on Brightspace.
- Go to your Course.
- Choose an Assignment.
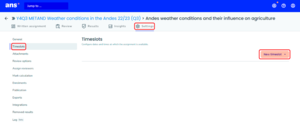
- Click the Settings tab and the Timeslots submenu.
- Click New Timeslot (see image above).
- You can either choose All Learners or a certain Group in the drop-down menu.
- Fill in the dates and times to set the Timeslot.
- Optionally fill in the Time Limit and the Extra Time (only applies to Learners who were given the right to Extra Time).
- Click Save.
Check other Assignment Settings
Some Assignment Settings cannot be changed once there are submissions, others are just more convenient to set beforehand. It is therefore advisable to check these, before making the Assignment available to Learners:
-
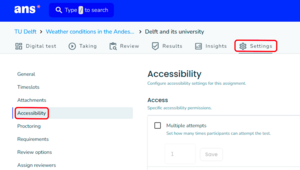
All the options in the Accessibility submenu of the Assignment Settings, are turned off by default. The table highlights two options – Attempts and Feedback - you might want to use for formative assessments.
Subheader Functionality Explanation Access Multiple Attempts Fill in the number of times each participant partakes in the Assignment. If this option is turned off participants get one Attempt. Utilities Feedback Participants will be able to see Feedback during the test, based on if their answer is correct, partially correct or incorrect. This option only applies to closed Question Types. And you need to fill in Feedback under Digital Test > Grading Scheme. To change the Accessibility Settings:
- Go to your Course.
- Choose your Assignment.
- Go to the Settings tab.
- Click the Accessibility submenu.
- Change the Settings to your liking.
- Do no forget to click Save if you change the number of Attempts.
-
The Grading Method drop-down contains different options, depending on the Assignment Type: Digital Assignments are reviewed digitally, while paper-based Assignments can be reviewed on paper or scanned to review digitally. Grading method and Assignment Type also determine which other Review Options will be shown. They are summarised in the table:
Assignment Types that are administered and reviewed digitally: Assignment Types that are administered on paper: - Select Peer Review for Learners to review each other.
- Select Self Review for Learners to review their own work.
- Select Review if you intend to review (you need an Instructor or Reviewer role)
- Review Digitally allows you to review in Ans after scanning the paper-based Assignment.
- Review on Paper ensures textboxes are printed for each Question in the test, so you can fill in scores on paper.
To change the Grading Method:
- Go to your Course.
- Choose your Assignment on the Assignments tab.
- Go to Settings.
- Click on the Review Options submenu.
- Choose an option from the Grading Method dropdown.
-
It is possible to show Learners preliminary results, upon submitting their Assignment. You can set this option in advance in the Assignment Settings. When selected, Learners will see the points they scored on Questions that are automatically graded. And they will see their grade if all Questions are automatically graded.
- Go to your Course.
- Choose your Assignment.
- Click the Settings tab.
- Click the Publication submenu.
- Check the Show Preliminary Result immediately after Submission checkbox.
Link to Assignments in Brightspace
-
Via Brightspace (only for formative Assignments)
You can link the Ans Assignment on Brightspace and schedule a Timeslot within Ans when the Assignment should be available.
Assignments within an Ans Course cannot be arranged in a preferred order. Therefore, it is recommended to publish links of formative Ans Assignments in the preferred order on Brightspace.
Via Ans
A Learner can directly log into Ans’ website with their TU Delft account. Their dashboard shows the Courses the Learner is enrolled in. The Assignments are only visible on the Learners’ dashboard if they are live.
This is the only possible method for Learners to get access to their summative exams, I.e. summative Courses, indicated with “EXAM”.
-
Learners can access Ans Assignments through the Brightspace environment (note: this is only possible for formative Assignments). Learners are automatically added to the Ans Course when they click on a link to an Ans Assignment in Brightspace.
Assignments in EXAM courses should never be linked to Brightspace!
You need an Instructor role in the Ans Course and a Course Manager, Instructor or Teaching Assistant with Grade Access role in the Brightspace Course, to create an Ans Assignment link in the Brightspace Course Content. And you need to have logged in to Ans at least once.
Add an Assignment link to Brightspace:
- Go to the Content in your Brightspace Course and go to the right module.
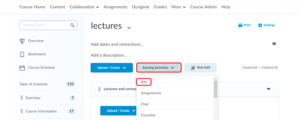
- Click the Add existing activities button and choose Ans from the drop-down.
- In the pop-up choose the Ans Course with the same name and academic year as the Brightspace Course you are working in. Use the Search Bar if necessary.
- Choose the Assignment you want to add to Brightspace. A new Content Item will be created.
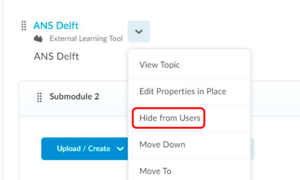
- You can hide the Assignment, with Hide from Users in the drop-down, if you do not want students to see the Assignment yet.
Make sure to add a Timeslot to the Ans Assignment before publishing the link in Brightspace. Without a Timeslot Learners don't have access to the Assignment, despite clicking the link.
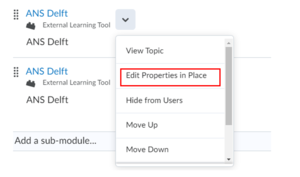
- It is not possible to open Ans embedded within Brightspace. Open the drop-down menu of the Content Item and choose Edit Properties in Place.
- Make sure the Open as External Resource box is ticked. This ensures that Ans opens in a new tab.
